Create a custom report
The Custom Report Writer software lets you create your own custom reports
using any of the fields that are available in your MLS.
To create a custom report
- From
the Admin menu, select Custom
Report Writer. The Custom Report Writer software opens in a new
window.
- Click
New
 in the Report Manager
task pane on the right side of the window.
in the Report Manager
task pane on the right side of the window.
- In
the toolbar, click in the Report Name field, and type the name you want
to use for your report (for example, My Client Summary Report).

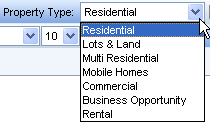
- Use the Property Type field to make sure the correct property type is selected (this will determine which fields are available).
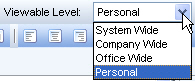
- Select
the appropriate Viewable Level.
The software defaults to Personal, which means that you are the only
person who will be able to run this report.
- Select
a Page Style.

- Add
the fields, images or other items (such as text and borders) you want
on your report to the layout area. Use your mouse to move items within
a section of the layout area. To move an item to another section of the
report, such as the Header Section, right-click the item with your mouse,
and select the desired section.
- Click
Save
 in the toolbar to save your report. Once it has
been saved, your custom report will be available for selection anytime
you run a
report in the MLS.
in the toolbar to save your report. Once it has
been saved, your custom report will be available for selection anytime
you run a
report in the MLS.
TIP:  View the video tutorial entitled "Custom Report Writer" on the Learning Center for a quick overview of this feature. The Learning Center can also be accessed directly from the Help menu.
Return to the Home Page
